Product
20in Rim

RIDER PROFILE

Name : Lydia Lumen
Origin : Germany
Information :
Height 1,70m.
Fell in love with drop bars, love my road bike and gravel,
but also ride my mountain bike sometimes.
SPECIFICATIONS
Bike
Frame : CFR 505 Carbonda custom paint
Shifters and Brake : Ultegra
Crankset : FSA Energy Supercompact 46/30
Derailleur : Ultegra RX
WHEELS
Rims : Light Bicycle Falcon AR36 Disc Road/CX/Gravel No-Hole Design
Hubs : Novatec D411SB-CL D412SB-CL 24H
Spokes : Sapim CX Ray
Nipples : Sapim Polyax
Valves : DT Swiss
Tires : Schwalbe Ultrabite 40mm
This is my story of building my new everyday riding mate – not my first build, but the first time I built up wheels on my own.
I started my “bicycle career” with a mountain bike, enjoying nature and being away from the city rush. Roughly two years later, I realized that I like it but I am more in the right spot when I have a drop bar in my hands, which by the way I never had used before. I simply tried a road bike and got addicted immediately. Then somehow I still wanted to go offroad – I equipped my drop-bar commuter bike with 35mm Panaracer EXTs and we crossed the Alps in the summer of 2020 – gravel roads of course!
But, I had some issues with my bike. It is slightly too long (has always been) and the gear is a road gear with a minimum gear transmission ratio of 1:1, which is already a rather small value for road bikes. I simply lost traction very often on the loose and steep gravel parts. Also, it was really hard to go with low cadence. I would prefer a higher cadence with lower torque to achieve the desired power output.


It was clear: I wanted a better-fitted bike, geometry as well as gearing.
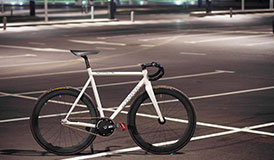
I found a perfect match with a Carbonda gravel frame and it was clear pretty fast – this will be a dream build, no matte UD (which would be the cheapest) but a great custom paint job. I created my own design and chose dark and bright teal colours with some very dark grey stripes, glitter in the shiny clear coat, and a pearly effect in the matte dark teal. Although I really love mechanical stuff and work in a deeply technical area, I have one thing: I love glitter, sparkling, and shiny stuff. Somehow I’ve always liked the reflection and refraction of light, for example, sunrise in a frosty surrounding is something adorable, when the sun creates sparkling fireworks everywhere.
Once the appearance of my dream bike was clear, I selected the components. An FSA 46-30 crankset with an 11-34 cassette and Ultegra components, which were luckily available. Ultegra for gravel? Yes, the STI is almost the same and the rear derailleur is an Ultegra RX, which I guess was the first road derailleur that had the clutch before Shimano created the GRX series.


I also wanted to have the option for a little bit wider tires, roughly 40mm.
For the wheels, I was deciding that this time I want to build them on my own. Since I knew Light Bicycle from tons of good reviews and saw how durable they are, the decision was clear: Carbon rims from Light Bicycle! I browsed through the different rims and I knew I wanted to have the possibility to ride 28mm up to 40mm tires on the rim, it would be nice if it had a rim height around 35-40mm AND I knew that Light Bicycle offers the possibility to have rims without holes in the center channel of the rim. Meaning, no tubeless tape, no issues with leakages at the tape or the valve crossing the tape. I found the AR36 rim with hooked beads that fulfilled my requirements.
After that, I spent hours in the gallery to see how the different carbon surfaces look like at that rim height and also what kind of rim decals are possible. Although 3K and 12K are somewhat fancy, I decided on matte UD and grey decals, because the frame has already been painted very flashy.
Then I saw some with a holographic silver rainbow decal style and – remember the love for shiny things? I got in touch with Light Bicycle about the decal styles. I was a bit afraid that having the complete decals in holographic design could be too much, so I asked if it was possible to have the usual grey decal style and just the holographic decal for the Light Bicycle logo at the valve position. Yes, it was! If in any case one day I get tired of the rainbow decal on the valve, I can just remove it and I have the basic grey design hidden below.
Edwin was my sales contact and he always answered very fast and also nice and – that’s something I’d like to point out, in perfect English. So communication was really fun stuff and always clear, which I think is very important. Once I finished the order I got a link, where I could see how the rims went stepwise through the processing. Then eventually they were finished and Edwin sent me photos of my rims. Shortly after that, I received a tracking number.
Now it was the time to decide for the spokes – the hubs have already been here. I calculated the length with “Spokomat” but I decided to ask Edwin for a suggestion since I trusted Light Bicycle more than software (I think Spokomat is great, but I had doubts in my capabilities of handling it). I wrote him which hubs and nipples I wanted to use and if he could help me with the spoke length for the CX Ray spokes. I just ordered them after Edwin helped me with that topic.
When the rim arrived I already finished my gravel bike, but I borrowed the wheels from my road bike.


So all I had to do was to build my wheels.
Since I couldn’t see the nipples from outside, I marked every spoke with two lines: the first, when the spoke thread had fully entered the nipple thread, and the second line, when maximum threading was reached. I didn’t want to risk broken spokes due to insufficient threading depth. For the assembly itself, I could just copy from a DT Swiss rim that also had 24 holes with straight pull hubs. Once one spoke is set, the other automatically points to the right holes due to the straight pull hub.
To get the nipples to the nipple holes I used dark magic. Well not really, but kind of. I wanted to pull them with a strong magnet from the outer side. Since the nipples themselves are not magnetic, I cut one cheap spoke and used the threaded part of it. I screwed it in each nipple. Then I put this into the valve hole and the strong magnet coupled to it. Sometimes at the nipple hole, I had to give it several tries, but it was never a big deal to get the nipple with the cut spoke out of the nipple hole. Then I unscrewed the spoke thread and assembled the CX ray – since I have small hands and slim fingers it was not a problem to grab the nipple while doing this. I can imagine with large hands - this could be painful with nipples that slip away and drop into the rim. However, for me, it was great fun and I would always do it again. Trueing then took some time, since I have never done it before. The marks on the spokes were very helpful to determine whether the thread depth is okay or not. With some time and also with patience, I was able to create two wheels with very equal tensions on the spokes and of course also a great trueing.
Now the last steps – putting discs, cassette, tubeless valves, and tires on the rims and inflating them. It was a bit tricky to get the Schwalbe Ultrabite 40mm on the rim, but not impossible. I feel the more tricky it is to get the tire on the rim, the easier it is to get them seated into the rim flange. Inflating them was very easy – they were immediately sealed, even in the first step, before I put the sealant in. By the way, the complete wheel build turned out to be 1385g. I never had such a lightweight wheelset before. Also, the rim height is a new maximum – I had 23 and 32mm before.


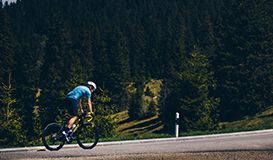
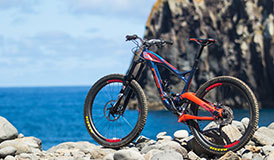
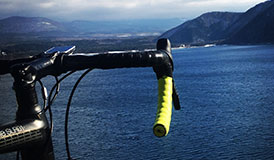
Then it was time for the first ride.
The wheels feel agile, although equipped with a bulky 40mm tire. I don’t want to do scientific research on that – the wheels simply feel good. My new bike already traveled roughly 1000km – 500km with the Light Bicycle wheels.
I can just tell that this is a dream build: the geometry is great; components are perfectly matching my requirements; it has a vivid driving behavior; and it is pretty much lighter than my old commuter; and as the cherry on top, it is absolutely beautiful.
Although I will use it as an everyday mate, I can’t wait to go for another bikepacking trip. Let’s see when this will be possible again, hopefully soon.


SHARE NOW:


May 11th, 2021 | Light Bicycle
MORE ADVENTURES
Get in touch
Feel free to leave a comment if you have any questions or suggestions on our products or other issues.

Please leave your name here.
E-mail is required for further contact.
Please enter a message.
Your Cookie Preferences
We use cookies to improve your experience on this website. You may choose which types of cookies to allow and change your preferences at any time. Disabling cookies may impact your experience on this website. You can learn more by viewing our Cookie Policy.
Cookies required to enable basic website functionality.
Cookies used to understand how the website is being used.
Cookies that are used to enhance the functionality of the website.
Cookies used to deliver advertising that is more relevant to your interests.